NUBOMEDIA CDN Tutorial
This application is an example of the usage of the CDN Connector. The application is based on the Nubomedia repository tutorial, adapted to utilize the CDN SDK to deploy the stored video on the NUBOMEDIA repository on the user's YouTube channel.
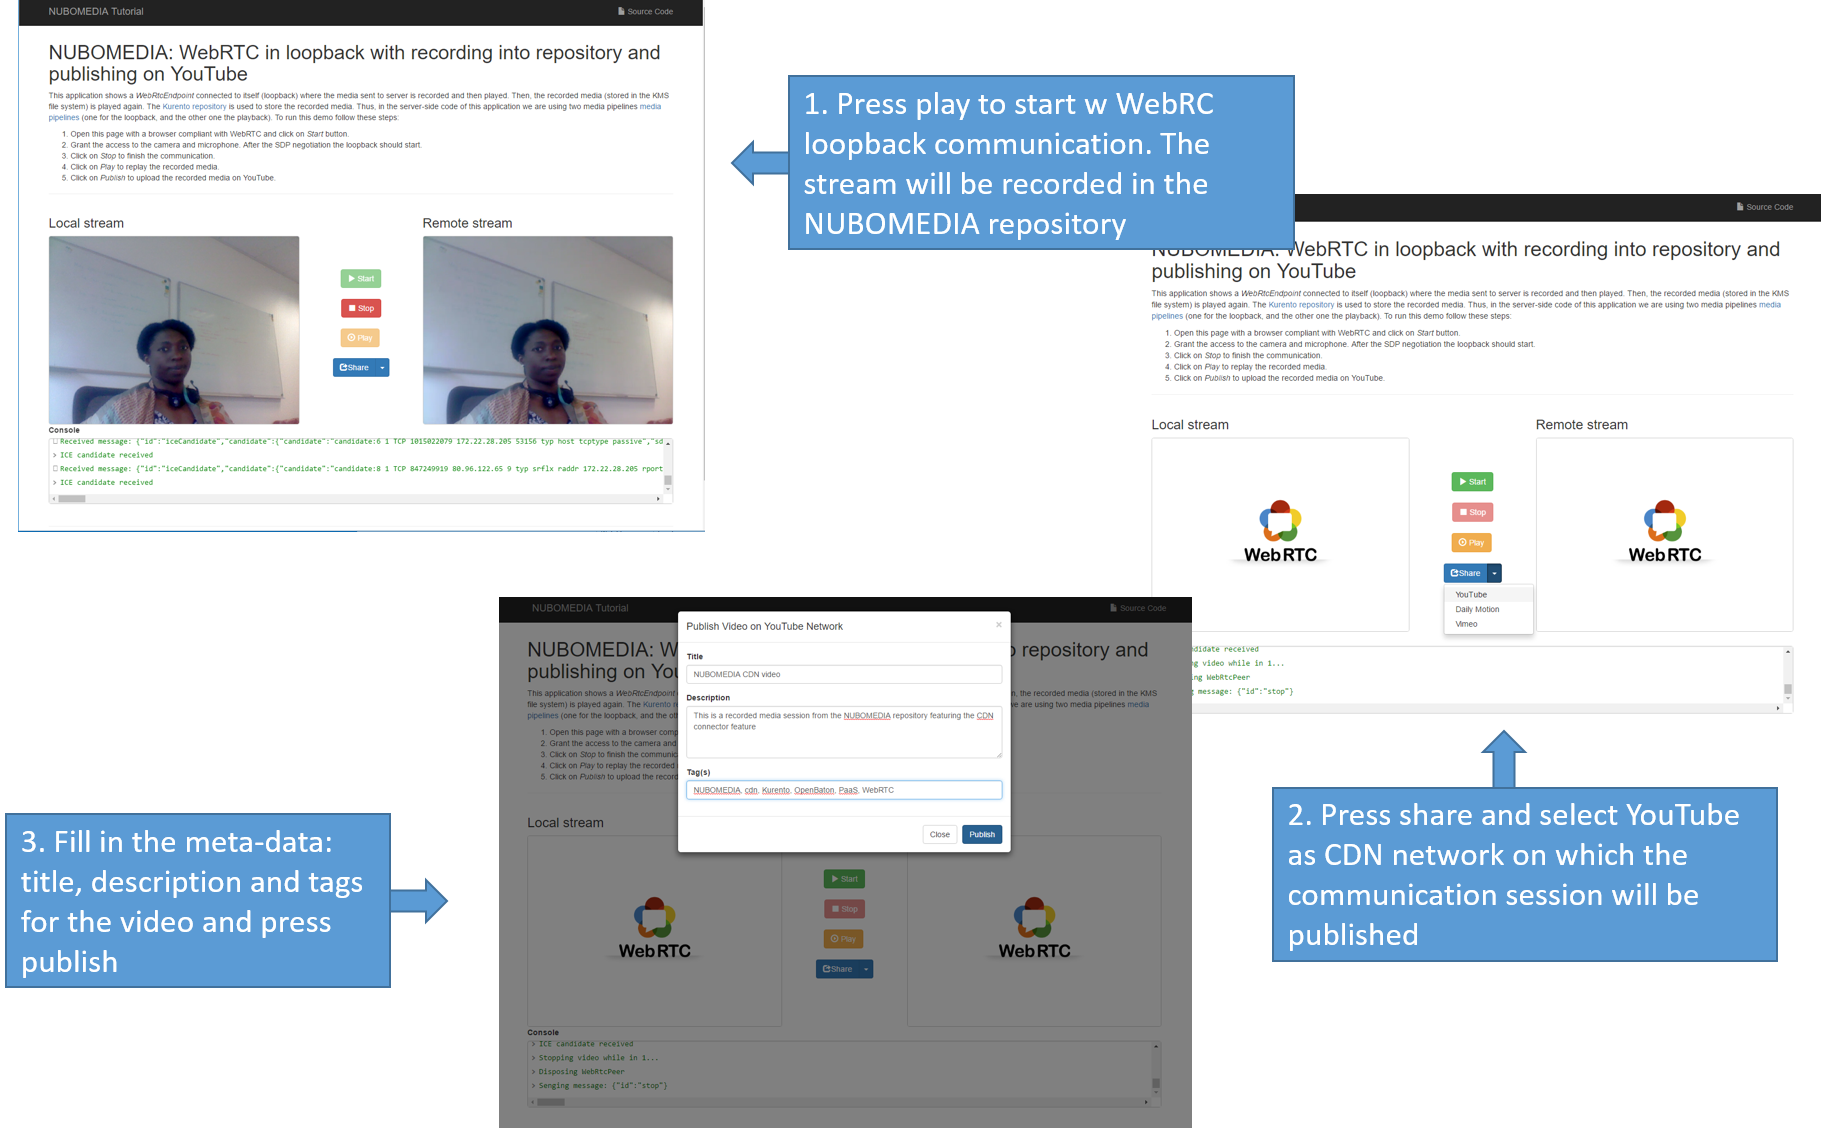
NUBOMEDIA CDN Screenshots
Looking into the source code
This application is open source (LGPL license) and it is available on GitHub.
NUBOMEDIA repository tutorial explains in details of the NUBOMEDIA Repository. This section concerntrates only on the service logic in utilizing the CDN connector SDK.
Dependencies we will need to include on our pom.xml include:
<dependency>
    <groupId>de.fhg.fokus.nubomedia</groupId>
    <artifactId>nubomedia-media-client</artifactId>
    <version>6.5.0</version>
</dependency>
<dependency>
    <groupId>de.fhg.fokus.nubomedia</groupId>
    <artifactId>nubomedia-repository-client</artifactId>
    <version>6.5.0</version>
</dependency>
<dependency>
    <groupId>de.fhg.fokus.nubomedia</groupId>
    <artifactId>nubomedia-cdn-client</artifactId>
    <version>0.0.7</version>
</dependency>
Info
We are in active development. Please take a look to the Maven Central Repository to find out the latest version of the artifacts.
- We need a single instance of the
CdnManager. In this example, this is done by means of a Spring Bean (see RepositoryApp class):
  @Bean
  public CdnManager cdnClient() {
    return new CdnManager();
  }
- As can be seen in the handler, each time a publish message arrives to the application server, the created user session is fetched from which the repository Item URL is obtained new UserSession class is created and a new media session is created is created:
  private void publish(WebSocketSession session, JsonObject jsonMessage) {
   //Get the active user session
   UserSession user = users.get(session.getId());

        if(user != null){
            Video publishedVideo = null;
            try {
                //Get repository item URL
                String repoURL = user.getRepositoryItemURL();

                //publish the video
                publishedVideo = cdnManager.uploadVideo(Schemes.YOUTUBE, repoURL, jsonMessage, credential, new MediaHttpUploaderProgressListener(){
                    @Override
                    public void progressChanged(MediaHttpUploader uploader) throws IOException {
                        JsonObject resp = new JsonObject();
                        switch (uploader.getUploadState()) {
                        case INITIATION_STARTED:
                            log.debug("Initiation Started");

                            resp.addProperty("id", "publishResponse");
                            resp.addProperty("msg", "Initiation Started");
                            session.sendMessage(new TextMessage(resp.toString()));

                            break;
                        case INITIATION_COMPLETE:
                            log.debug("Initiation Completed");

                            resp.addProperty("id", "publishResponse");
                            resp.addProperty("msg", "Initiation Completed");
                            session.sendMessage(new TextMessage(resp.toString()));
                            break;
                        case MEDIA_IN_PROGRESS:
                            log.debug("Upload in progress, " + uploader.getProgress() + "%");

                            resp.addProperty("id", "publishResponse");
                            resp.addProperty("msg", "Upload in progress "+ uploader.getProgress() + "%");
                            session.sendMessage(new TextMessage(resp.toString()));
                            break;
                        case MEDIA_COMPLETE:
                            log.debug("Upload Completed!");

                            resp.addProperty("id", "publishFinished");
                            resp.addProperty("msg", "Upload Completed. Your video can now be found on the selected CDN platform");
                            session.sendMessage(new TextMessage(resp.toString()));
                            break;
                        case NOT_STARTED:
                            log.debug("Upload Not Started!");
                            break;
                        }
                    }
                });
            } catch (Exception e) {
                // TODO: handle exception
            }
            finally {
                if(publishedVideo!=null)
                {
                    JsonObject resp = new JsonObject();
                    resp.addProperty("id", "publishFinished");
                    resp.addProperty("msg", "Video ID:"+ publishedVideo.getId());
                    sendMessage(session, new TextMessage(resp.toString()));
                }
            }
        }else{
            log.debug("No active user founf for this session");
        }
    }
Deployment
The deployment of this application can be done by means of the PaaS Manager directly from the source code hosted on GitHub. To do that, first of all we need to define a Dockerfile inside our project.
FROM nubomedia/apps-baseimage:src

MAINTAINER Nubomedia

ADD keystore.jks /
ADD . /home/nubomedia

RUN sudo chown -R nubomedia /home/nubomedia
RUN cd /home/nubomedia && mvn compile

ENTRYPOINT cd /home/nubomedia && mvn exec:java
Examining the content of this file, we can see how the content of the project is included into the platform:
ADD . /home/nubomedia: This line includes the whole content of the project.ADD keystore.jks /: This line includes the the Java keystore to the root. This is required to serve the application by HTTPS, which is mandatory in the latest version of WebRTC in browsers.
After that, several Maven command are configured:
RUN cd /home/nubomedia && mvn compile: Compile the project.ENTRYPOINT cd /home/nubomedia && mvn exec:java: Run the deployed application.
At this point, we are able to deploy our application in NUBOMEDIA. To that aim, we can use the PaaS Manager GUI.
Info
The access to the PaaS Manager should be done with authentication credentials (login/password). The NUBOMEDIA project manages a NUBOMEDIA PaaS instance that is reserved to the institutions being part of the project. If you are not part of the NUBOMEDIA project but you want to use NUBOMEDIA you should install your very own PaaS following the installation instructions.
Once logged in the PaaS Manager, first we have to click on the Create App button inside the Applications section. It is very important to define the GitHub URL in which the project is hosted. In this example, we are not using the scaling mechanisms and a single number of replicas. Finally, it is very important to mark the checkbox "Do you need a cloud repository for your app?", since the repository it is a requirement for the application:
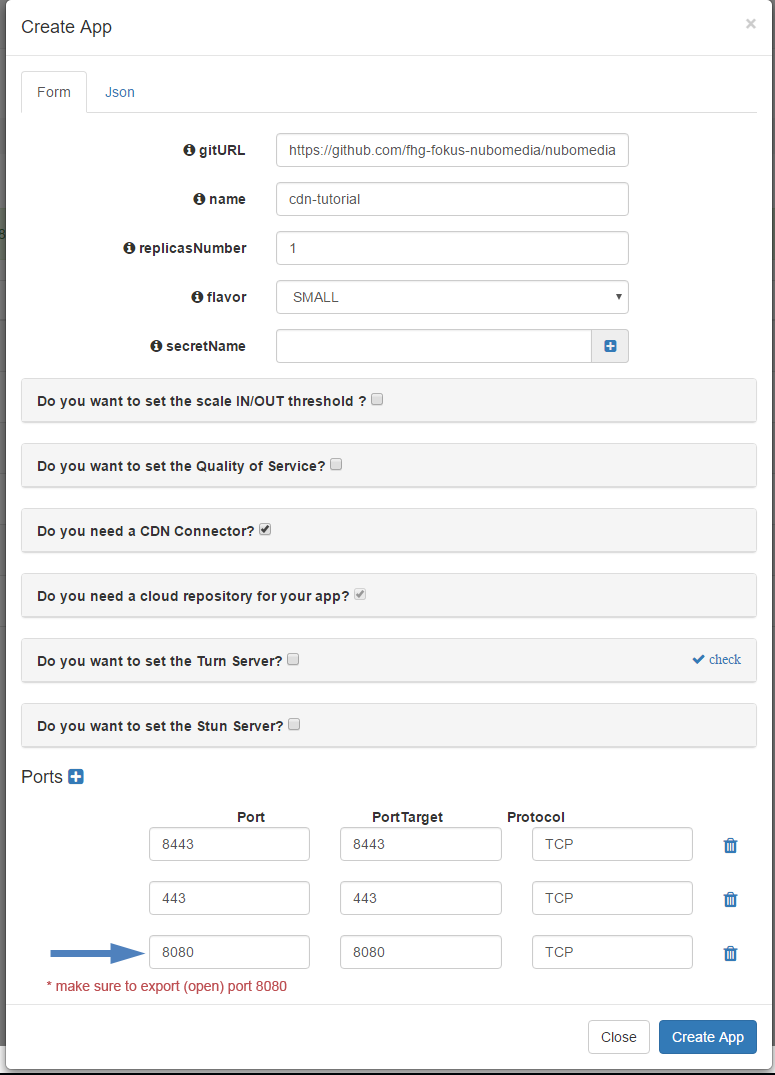
PaaS Manager Settings for Repository Tutorial
We can check out the building log by clicking the Build log button. If everything goes fine, our application should move to the RUNNING state. In that case, our application will be up and running inside NUBOMEDIA. In this case, we are able to trace our application logs by clicking on the App log button.