NUBOMEDIA Magic-Mirror Tutorial
This application is an example of usage of the Media API. This application is based on the Kurento magic-mirror tutorial, adapted to be deployed on the NUBOMEDIA PaaS.
Understanding this example
This application uses computer vision and augmented reality techniques to add a funny hat on top of the detected faces in a WebRTC stream. The following picture shows a screenshot of the demo running in a web browser:
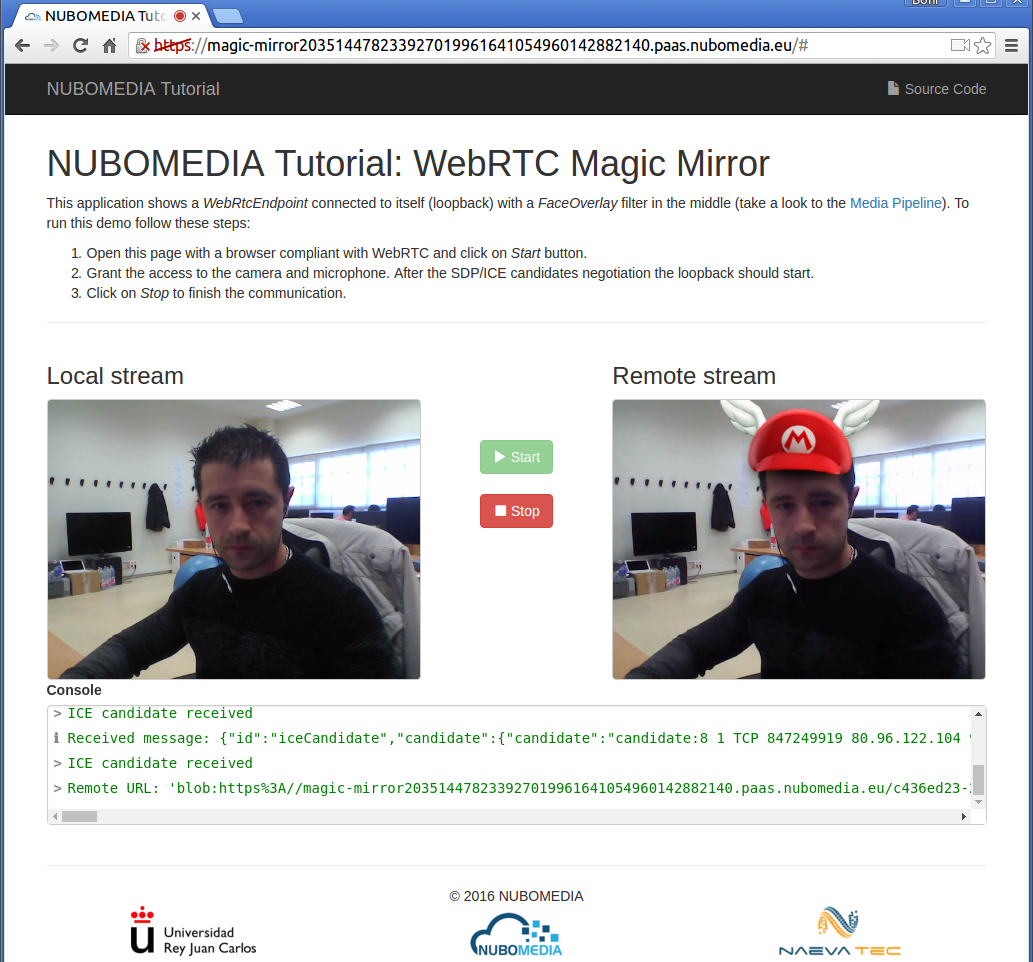
NUBOMEDIA Magic Mirror Screenshot
The Media Pipeline implemented in the server-side of this demo is composed by the following Media Elements:
-
WebRtcEndpoint: Provides full-duplex (bidirectional) WebRTC capabilities.
-
FaceOverlay filter: Computer vision filter that detects faces in the video stream and puts an image on top of them. In this demo the filter is configured to put a Super Mario hat.
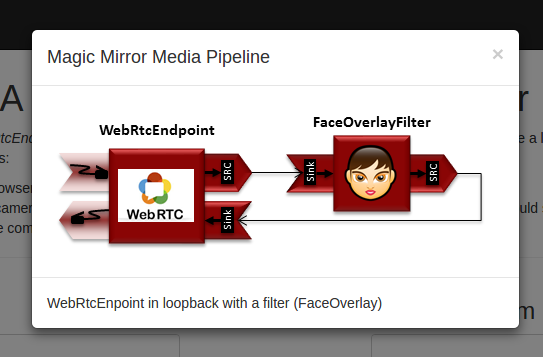
Magic Mirror Media Pipeline
Looking into the source code
This application is open source (LGPL license) and it is available on GitHub. From a functional point of view, the logic is very similar to the Java version of Kurento magic-mirror tutorial. For further details (server-side, client-side), please visit that documentation.
In order to migrate the existing Kurento application to the NUBOMEDIA cloud, several aspects have to be taken into consideration:
- To add nubomedia-media-client as dependency. As depicted in the Media API section, this library should be included in any Java application which is going to be deployed in the NUBOMEDIA PaaS. Since this tutorial is created in Maven, the following dependency should be included in the pom.xml:
<dependency>
    <groupId>de.fhg.fokus.nubomedia</groupId>
    <artifactId>nubomedia-media-client</artifactId>
    <version>6.5.0</version>
</dependency>
Info
We are in active development. Please take a look to the Maven Central Repository to find out the latest version of the artifacts.
- The way in which the Kurento Client is instantiated should be changed. As depicted on Kurento documentation, the Kurento Client is the piece of software aimed to control the Kurento Media Server (KMS). Inside NUBOMEDIA, the instances of KMSs are elastically managed by the platform, scaling in and out depending on the load of the system. In Kurento tutorials, the way of creating Kurento Clients is done by means of Spring Beans, and so, there is a single instance of Kurento Client by application. This makes sense when a single instance of KMS is being used (which is the typical way of working just with Kurento). Inside NUBOMEDIA this is not always true, and therefore we need to create a new instance of KurentoClient for every media session. This is implemented in the Java class UserSession. As can be seen in the handler, each time a start message arrives to the application server, a new UserSession class is created and a new media session is created is created:
  private void start(final WebSocketSession session, JsonObject jsonMessage) {
    // User session
    String sessionId = session.getId();
    UserSession user = new UserSession(sessionId, this);
    users.put(sessionId, user);

    // Media logic for magic mirror
    String sdpOffer = jsonMessage.get("sdpOffer").getAsString();
    String sdpAnswer = user.startSession(session, sdpOffer);

    // Response message
    JsonObject response = new JsonObject();
    response.addProperty("id", "startResponse");
    response.addProperty("sdpAnswer", sdpAnswer);
    sendMessage(session, new TextMessage(response.toString()));
  }
The instantiation of KurentoClient and the media logic (i.e., the media pipeline and the media element connectivity) is done in the method
startSessionof the UserSession class. In this case, we are reserving 25 points per user session. Supposing that the application is deployed in aMEDIUMinstance (i.e., 2 VCPUs, and therefore 200 points available), that means that it will be supported 8 concurrent sessions (200/25=8). In this example, the 9th session will raise aNotEnoughResourcesException(this exception is managed in the handler):
  private final static int POINTS_PER_SESSION = 25;

  public String startSession(final WebSocketSession session, String sdpOffer) {
    // One KurentoClient instance per session (reserving points per session)
    Properties properties = new Properties();
    properties.add("loadPoints", POINTS_PER_SESSION);
    kurentoClient = KurentoClient.create(properties);
    log.info("Created kurentoClient (session {})", sessionId);

    // Media logic (pipeline and media elements connectivity)
    mediaPipeline = kurentoClient.createMediaPipeline();
    log.info("Created Media Pipeline {} (session {})", mediaPipeline.getId(), sessionId);

    webRtcEndpoint = new WebRtcEndpoint.Builder(mediaPipeline).build();
    FaceOverlayFilter faceOverlayFilter = new FaceOverlayFilter.Builder(mediaPipeline).build();
    faceOverlayFilter.setOverlayedImage("http://files.kurento.org/img/mario-wings.png", -0.35F,
        -1.2F, 1.6F, 1.6F);
    webRtcEndpoint.connect(faceOverlayFilter);
    faceOverlayFilter.connect(webRtcEndpoint);

    // WebRTC negotiation
    webRtcEndpoint.addOnIceCandidateListener(new EventListener<OnIceCandidateEvent>() {
      @Override
      public void onEvent(OnIceCandidateEvent event) {
        JsonObject response = new JsonObject();
        response.addProperty("id", "iceCandidate");
        response.add("candidate", JsonUtils.toJsonObject(event.getCandidate()));
        handler.sendMessage(session, new TextMessage(response.toString()));
      }
    });
    String sdpAnswer = webRtcEndpoint.processOffer(sdpOffer);
    webRtcEndpoint.gatherCandidates();

    return sdpAnswer;
  }
It is very important to release this instance of KurentoClient when the media session is finished. This is implemented in the method
releaseof this class (UserSession). As can be seen, in this method the media pipeline is also released:
  public void release() {
    log.info("Releasing media pipeline {} (session {})", getMediaPipeline().getId(), sessionId);
    getMediaPipeline().release();

    log.info("Destroying kurentoClient (session {})", sessionId);
    getKurentoClient().destroy();
  }
This release process can be triggered by two events:
1- On the reception of the
stopmessage in the handler. This message is sent from the client-side of the application when the user explicitly clicks on the Stop button on the GUI:
function stop(stopMessage) {
    console.log("Stopping video call ...");
    setState(I_CAN_START);
    if (webRtcPeer) {
        webRtcPeer.dispose();
        webRtcPeer = null;

        if (stopMessage == undefined || stopMessage) {
            var message = {
                id : 'stop'
            }
            sendMessage(message);
        }
    }
    hideSpinner(videoInput, videoOutput);
}
2- When the WebSocket used for signaling between the client and server-side is closed. This event is captured in the handler as follows:
  @Override
  public void afterConnectionClosed(WebSocketSession session, CloseStatus status) throws Exception {
    log.info("Closed websocket connection of session {}", session.getId());
    release(session);
  }
To handle correctly the WebSocket close, in the client-side, the event
onbeforeunloadis captured to close explicitly the WebSocket. This happens for example when user closes directly the browser (instead of clicking the Stop button). In the end this a web application, and that situation is very usual. Thus, the application should be implemented properly to release the resources.
var ws = new WebSocket('wss://' + location.host + '/magicmirror');

window.onbeforeunload = function() {
    ws.close();
}
Deployment
This application has been implemented as an Spring-Boot application. Spring-boot allows to create stand-alone Spring applications embedding an application server (Tomcat) without need to deploy WAR files. The resulting application is simply a JAR file which packages a web application which is deployed in the application server when the main class is executed. This is done by means of Maven (see ENTRYPOINT command in the above instructions).
The deployment of this application can be done by means of the PaaS Manager directly from the source code hosted on GitHub. To do that, first of all we need to define a Dockerfile inside our project, as follows:
FROM nubomedia/apps-baseimage:src

MAINTAINER Nubomedia

ADD . /home/nubomedia

ENTRYPOINT cd /home/nubomedia && mvn spring-boot:run
Examining the content of this file, we find out how the content of the project is included into the platform:
ADD . /home/nubomedia: This line includes the whole content of the project in the container.
After that, we set the Maven command to run the application:
ENTRYPOINT cd /home/nubomedia && mvn spring-boot:run: Run the Spring-Boot application.
At this point, we are able to deploy our application in NUBOMEDIA. To that aim, we can use the PaaS Manager GUI.
Info
The access to the PaaS Manager should be done with authentication credentials (login/password). The NUBOMEDIA project manages a NUBOMEDIA PaaS instance that is reserved to the institutions being part of the project. If you are not part of the NUBOMEDIA project but you want to use NUBOMEDIA you should install your very own PaaS following the installation instructions.
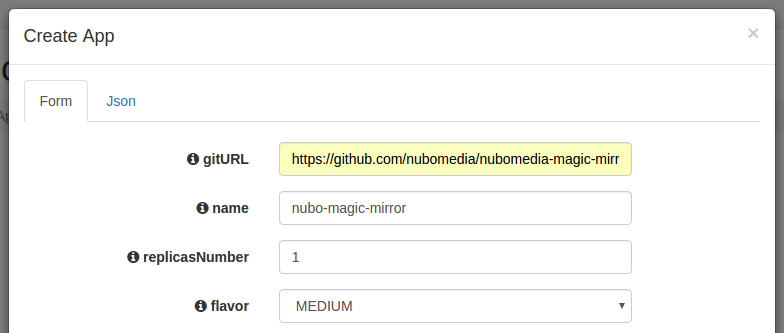
Once logged in the PaaS Manager, first we have to click on the Create App button inside the Applications section. It is very important to define the GitHub URL in which the project is hosted. In this example, we are not using the scaling mechanisms and a single number of replicas:
PaaS Manager Settings for Magic Mirror Tutorial
We can check out the building log by clicking the Build log button. If everything goes fine, our application should move to the RUNNING state. In that case, our application will be up and running inside NUBOMEDIA. In this case, we are able to trace our application logs by clicking on the App log button.